Monday, July 27, 2015

MY FRESHMAN DORM ROOM

Your freshman year of college is a big deal, and even though your room might feel like it's the size of a cardboard box, it's still super important to make it feel like a home.

I shared a very tiny room with one other person. (Shoutout to Shinali!) I ended up absolutely loving college and freshman year, but along with all that I loved my room. Since you're most likely living on your own for the first time, I cannot stress enough that you should make it feel cozy and inviting!

Here's what mine looked like...

I hung real frames on the wall with velcro command strips, and it just felt more home-y than taping a bunch of prints to my wall. (Plus, I used to have a gigantic photo wall at home and needed a change.) 

String lights were my best friend! Anyways, this post doesn't have much purpose except to hopefully inspire anyone moving into a dorm not to be afraid to go all out!

For a full video tour, watch this. :) 


Saturday, July 25, 2015

LIFE HACKS: DRY SHAMPOO

The other day before work, I had a minor freakout. My roots were really oily, but I didn't have time to wash my hair before work. Normally, I use my TREsemme dry shampoo and style as usual. When I went to spray it, IT WAS EMPTY.

I was not in the mood to walk around like a grease ball, but as per usual, Pinterest/the internet came to my rescue. 

You can use CORNSTARCH.


All you have to do to apply is take an old fluffy makeup brush, and apply the cornstarch to the greasy areas of your hair. (For me it's usually my roots!) Then wait a few minutes, and brush it out!

The cornstarch totally absorbs the extra oil and will get you through the day. Sometimes I like to brush it out rigorously with my fingers, to try and get a little volume while I de-grease. 


Make sure you get all the cornstarch out, because you don't want to walk around with white hair! I have light hair, but if you have darker hair you can add a little cocoa powder to mask the color. It sounds weird, but I swear this stuff works wonders!

It's also way more natural than the aerosol cans of dry shampoo, so I'm considering making this switch permanently. Good luck! :)

Monday, July 20, 2015

$4 DIY TYPOGRAPHY FRAMED ART

So today I decided I have so much fun wall art that I'm going to do a gallery wall in my new apartment. The trick to gallery walls is to have a good combination of art, text, and photos. Which was I lacking? The text! 

I've seen so many cute gallery walls online, and there's almost always cool quotes in minimalist designs. I realize this is a super easy DIY, but not everyone may know the best way to do it, so here we go....


All you need to do to start is go on photoshop, or an equivalent. (Pixlr editor is a free online photoshop!) Create a very large blank image; make sure the smaller side, length or width, is still at least 1000px. You want your image to be high quality when you print it. If you already know what size frame you're getting, you can constrain the proportions and crop the image. (I did 8in x 10in for my proportions when I cropped it)

From here, get creative! Add your favorite quote, song lyrics, or even just a cool word. You can do it horizontally or vertically. Then when my images were completed and saved, I went on Walgreens photo online to order my prints.

Lucky for me, there was a little sale, so it was only $6 for both of my 8x10 prints! You can also try Kinko's or CVS or your home printer if you have photo paper. I like to print my pictures at Walgreens instead of at home, because I feel like the ink ends up being more expensive at home.

Just remember, the larger the print you want, the larger your photoshop image needs to be! For my "good morning, sunshine" print, I made the background slightly off-white to make it look a little classier than a bright white print.

Then I went to Dollar Tree, got 2 gold frames for $2, and that's it! Awesome gallery wall art for only $4 each. I'm so excited to put it all together!

Saturday, July 18, 2015

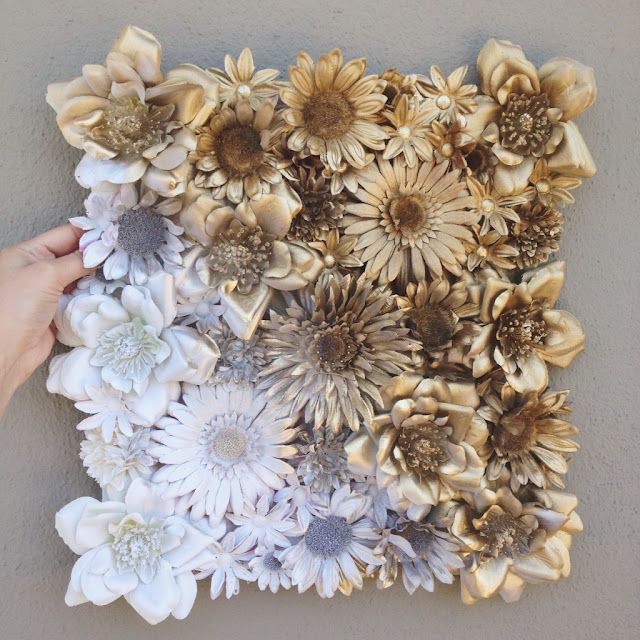
DIY FLORAL OMBRÉ WALL ART

Yesterday was a Friday at work, and every time I got a little distracted I was on Pinterest. I'm getting ready to move into my first real apartment, so there's 5 billion diy home decor projects I want to do! I found this picture on Pinterest, reposted from this blog (couldn't find the original post).


^ mine vs. pinterest ^

I thought it was super cute, but I wasn't really into the bright colors, so I recreated the project here in my own style!

ALL YOU NEED...
  • An assortment of fake flowers (all different sizes and shapes!)
  • hot glue gun
  • foam core (a huge sheet is a couple bucks)
  • exact-o knife
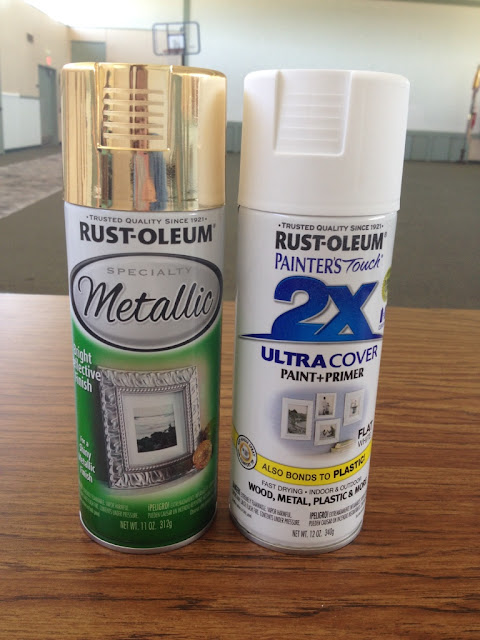
  • spray paint (at least 2 colors)


It doesn't matter what colors your flowers are, but I tried to get a lot of white since I knew it would be the easiest color to cover. Just get the cheapest fake flowers possible! Most craft stores have a clearance section with "out of season" fake flowers. The foam core is so much cheaper than a canvas, and it's sturdier than cardboard. Also, with the foam core, you can make any shape you want! I think a big initial or a heart would be cute too.


I started by cutting all the stems off the fake flowers, getting as close to the actual flower as possible. The flatter it is, the easier it is to glue on. Lay them all out on top of the foam in the arrangement you want. Now you can see how big you need your foam to be.


Make sure to cut your foam core a little smaller (about half an inch) than necessary to avoid blank spaces later. Once you cut out your foam core, go ahead and hot glue those bad boys on!


Let the glue set and dry for about 10 minutes. After that, spray paint them thoroughly with whatever colors and ombré fades you want. Make sure you do a second coat of paint after the first one dries. That's it!


Wednesday, July 15, 2015

5 ESSENTIALS FOR YOUR INTERNSHIP WARDROBE

Knowing what is work-appropriate can be tricky. You don't want to be undressed, but you definitely don't want to overdo it.

It's officially been a week working for my internship at a large aerospace company. I am working in the IT department, and as you may guess it is not the most fashion-forward group of the company. Along with this, I'm one of very few women.

The thing is, I'm only a second year college student, and this is a very valuable time to start networking early. Sure I could get away with wearing blue jeans and a hoodie, but here are my top reasons why I like to put a little more effort into my outfits for work:


  • You never know who you're gonna meet.
    • Already, only a week into the job, I've met so many superiors and even people from other companies. With such easy networking opportunities, you don't want to mess up that first impression simply because you were too lazy to put in any effort in the morning.
  • "Dress for the job you want, not the job you have."
    • A fairly well-known quote that holds a lot of truth. If you ever want to move up in rank, it really helps to show that you can at least dress the part.
  • It's fun to dress up!
    • Yeah yeah yeah, maybe this is just me, but I like having an excuse to wear my cute clothes and be creative with business casual looks. If no other reason suits you, at least it's a reason to wear that really cute blazer you never get to wear otherwise! 

Now by no means am I saying that you can't dress super casual and still be successful, all I'm saying is that it doesn't hurt to make yourself a little presentable. :) Now that I've covered that spheal, here are some tips to create easy business-casual looks!


  • Boyfriend-style blazers
    • Blazers that are a boyfriend fit are so perfect for an internship. They're cut so that they're not super fitted, and hang down longer like a cardigan. You can wear them with nice jeans and a simple top and it pulls the whole outfit together without looking like you're trying to wear a suit. I wouldn't wear a blazer every day, but every once in a while it's nice to switch it up, especially on those days you know you'll have a meeting.


  • Black jeans
    • Black jeans are KEY!!! I actually never owned black jeans until right before I started this new job, and boy did they save my life. You can honestly wear any cute top and shoes with black jeans, and you instantly look 10x more put together than if you wore denim. I've found that the darker the jeans, the dressier you look. (TIP: get skinnies/straight leg but NOT jeggings!)


  • Cute flats/sandals
    • As equally fun and painful as heels can be, spare yourself the trouble and invest in really cute shoes with flat soles. Some workplaces don't allow open toe, but I'm fortunate enough to be able to wear all my cute summer sandals. If you need closed toe, find some fun flats or loafers. 


  • Statement jewelry
    • Since an internship doesn't really require too fancy of clothing, go ahead and wear your favorite basics by adding a statement necklace! You can totally make your favorite cotton tee work, and a little bling will go a long way.


  • A grown-up purse
    • This one was a big one for me. I've always been the girl to buy a cheap little crossbody purse and use it for years, but going in to this new job I actually needed some more room in my purse (and something a little more presentable). You never know if you're going to need to bring a notebook, folder, tablet, or even a laptop with you, and having that extra storage space really helps. Having a larger, nice purse will also help you feel much more professional and will be that final touch that pulls every outfit together.

I hope these tips were helpful and that the next time you walk into a new job, you feel confident with what you're wearing and confident with yourself! Don't be afraid to get creative, it's definitely a process of experimentation. 

Sunday, July 12, 2015

EASY SUMMER MEALS: MUSHROOM PASTA

It was one of those days. You know what I'm talking about... the days where you mindlessly surf Pinterest until you're so inspired that you convince yourself you're a gourmet chef? Maybe it's just me.

Alas, after looking at so many gorgeous photos of food, I decided it was my night to make dinner for the family. Best part of this recipe, I didn't have to go to the store! That's right, this was SO easy and convenient and I'm excited to share it with you.

Didn't end up using that zucchini because I wanted my brother to have dibs on cooking it. He GREW that monster... crazy right?!


MUSHROOM PASTA - 4 servings
8oz thin spaghetti (or any pasta of your choice)
1/3 cup vegetable broth (chicken works too)
1 handful of baby spinach
3 tbsp butter
6-8oz of sliced mushrooms (I used baby bellas; white will work)
3 tbsp-ish olive oil (I don't really like to measure things most of the time)
2 cloves minced garlic
1/3 cup parmesan cheese (more or less)
spices of your choice; to taste (I used salt & pepper, oregano, red pepper flakes!)
1 tbsp chopped parsley (optional)


1. Bring a pot of salted water to boil and cook pasta according to directions. While pasta is cooking, heat olive oil, garlic, and spices in a deep saucepan over medium-high heat. (Hold off on the salt & pepper)

2. Once the oil is simmering, add sliced mushrooms, salt & pepper into the pan and stir them around until mushrooms are cooked and brown on both sides. Turn heat off but do not remove the pan from the hot stove. Add spinach to pan and stir in; they will wilt as the hot pan sits there. 

3. Stir butter and broth into to the mixture. When pasta is done cooking, drain the water and keep it in the pot. Pour all the sauce and mushrooms from the pan into the pot of pasta.

4. Add parmesan cheese and parsley to pot and stir well. All done! It's really that simple.


You'll know when to add the mushrooms because the garlic and spices will smell AMAZING. It really doesn't matter what you use, just add whatever spices you like and have in the cupboard.

Had to stop myself from just eating these mushrooms by themselves!

Make sure you use a pan deep enough to hold some liquid.

Since we're not baking, spreadable butter works just as well as sticks.

Yummy sauce waiting for pasta to cook!

Don't be afraid to add lots of cheese.

I served ours with a fresh fruit & feta salad. Maybe I'll do a post for that next. ;)

I hope you're as satisfied as my parents were! Good luck!